The Best Fluffy Pancakes recipe you will fall in love with. Full of tips and tricks to help you make the best pancakes.
Braised Chicken: How to Keep It Moist & Flavorful
Learn how to make juicy braised chicken with perfectly crispy skin in the oven. Step-by-step guide ensures tender meat and golden results every time.

Are you looking for a delicious chicken dish with tender meat and crispy skin? Braised chicken in the oven is the perfect choice. It turns a simple chicken into a gourmet meal that will wow your loved ones.
Braised chicken is a special way to bring out deep flavors and keep the meat juicy. It’s great for anyone wanting to improve their cooking or find new recipes. Learning to make braised chicken will change how you cook forever.
Get ready to learn how to make braised chicken with golden, crispy skin and incredibly tender meat. This guide will show you everything, from picking the best ingredients to mastering the cooking technique.
Key Takeaways
- Learn the ultimate technique for achieving crispy braised chicken
- Understand the science behind perfect braising methods
- Discover how to maintain moisture while creating crisp skin
- Master temperature control for optimal cooking results
- Transform your home cooking with professional-level braising skills
Understanding the Art of Braised Chicken
Crispy braised chicken is a cooking technique that turns simple chicken into a gourmet meal. It’s different from other cooking methods because it focuses on flavor and tenderness.
Distinctive Cooking Approach
Braising is unique because it combines two important steps:
- First, it uses high heat to add flavor.
- Then, it cooks slowly in liquid to make the meat tender.
- It also keeps moisture in by sealing the dish.
Remarkable Benefits of Braising
This method brings many benefits to your chicken:
- It enhances flavor.
- It makes the meat tender.
- It’s a versatile technique.
- It saves time in the kitchen.
Scientific Secrets of Crispy Skin
The secret to crispy chicken lies in controlling moisture and fat. By managing temperature and environment, you get a crispy outside and juicy inside.
Professional chefs focus on temperature and skin prep for crispy chicken. Your technique affects the dish’s texture and taste.
Essential Equipment and Ingredients for Perfect Braised Chicken
To make delicious braised chicken, you need the right tools and ingredients. Choosing quality equipment and ingredients is key to a great dish.
Here’s what you’ll need for braised chicken:
- Dutch oven or heavy-bottomed cast-iron pot – provides even heat distribution
- Sharp kitchen knife for precise meat preparation
- Meat thermometer to ensure perfect doneness
- Tongs for handling chicken safely
- Cutting board with chicken-specific section
For the best braised chicken, pick fresh and quality ingredients. Opt for organic, free-range chicken for better taste and texture. Your list should include:
- High-quality chicken pieces
- Fresh aromatics like garlic, onions, and herbs
- Olive oil or butter for initial searing
- Braising liquids such as chicken stock, white wine, or broth
- Seasonings like sea salt, black pepper, and dried herbs
Professional chefs know that braised chicken needs careful ingredient choice. The right tools and ingredients turn a simple meal into a masterpiece. Each part is important for rich flavors and crispy skin.
Preparing Your Chicken for Braising
Starting to make crispy braised chicken thighs with olives means getting ready with care. The secret to a great dish is in the chicken prep before cooking.
Preparing chicken for braising is all about the details. You want to get the best flavor and that crispy skin everyone craves.
Proper Cleaning and Patting Techniques
When you’re working with chicken thighs, safety comes first. Here’s what you need to do:
- Rinse chicken under cold running water
- Use paper towels to pat chicken completely dry
- Discard used paper towels immediately
- Clean all surfaces with hot, soapy water
Drying your chicken well is key for crispy skin. Too much moisture stops the skin from getting that golden-brown crunch.
Seasoning and Marination Tips
Seasoning can turn simple chicken into a feast. Here are some tips to add flavor:
- Use kosher salt and freshly ground black pepper
- Add chopped olives for extra depth
- Incorporate herbs like thyme or rosemary
- Let chicken marinate for 1-2 hours before cooking
Room Temperature Considerations
Bringing chicken to room temperature before braising is important. Remove chicken from the refrigerator 30-45 minutes prior to cooking. This step helps cook evenly and gets that crispy skin.
By using these prep steps, you’ll make a braised chicken dish that will wow your guests.

Table of Contents
Best Cuts of Chicken for Oven Braising
Choosing the right chicken cut is key for oven braising. Some cuts are better than others, offering amazing flavor and texture. They can make your home-cooked meals truly special.
Chicken thighs are the top choice for braising. Their fat keeps the meat juicy and tender. This makes your chicken with lemons and capers incredibly flavorful, unlike breast meat.
- Chicken Thighs: Best overall cut for braising
- Chicken Legs: Another excellent slow-cooking option
- Bone-in Cuts: Provide more flavor depth
- Skin-on Pieces: Help retain moisture
Thighs and legs are great for slow cooking. They stay moist and soak up flavors well. For the best taste, pick bone-in, skin-on varieties of oven braised chicken thighs.
Don’t use chicken breasts for braising. They dry out and get tough. Their lean meat doesn’t cook well for long periods.
Experts say to choose chicken thighs with lots of fat. This fat melts during cooking, making the chicken super tender. It’s perfect with tangy ingredients like lemons and capers.
Step-by-Step Guide to Achieving Crispy Skin
Getting crispy braised chicken right takes skill and technique. The perfect crispy skin turns a simple dish into a work of art. With the right steps, you can get a crispy outside and a juicy inside.
Getting crispy braised chicken isn’t just luck. It’s a science that needs careful heat control, moisture management, and timing.
Temperature Control Techniques
Crispy skin starts with the right heat. Follow these key strategies:
- Preheat your oven to 425°F for initial high-heat searing
- Reduce temperature to 350°F for even cooking
- Use a cast-iron skillet for consistent heat distribution
Moisture Management Methods
Controlling moisture is key for crispy braised chicken. Try these expert techniques:
- Pat the chicken skin completely dry before cooking
- Use a paper towel to remove excess moisture
- Avoid covering the chicken during the final cooking stage
Timing and Flipping Guidelines
Perfect timing is crucial for crispy braised chicken. Here are some essential tips:
- Sear skin-side down for 5-7 minutes initially
- Flip only once during cooking to maintain crispiness
- Allow 15-20 minutes of uncovered cooking for ultimate crunch
Pro tip: Let the chicken rest for 10 minutes after cooking to help the skin maintain its crispy texture.
Flavorful Braising Liquids and Aromatics
Starting a delicious braised chicken is all about the right liquids and aromatics. The braising liquid you choose can turn a simple dish into a feast for the senses. It adds deep, rich flavors to every piece of chicken.
Here are some exciting liquids to try for your braised chicken:
- Chicken Stock: A classic choice that boosts chicken flavors
- White Wine: Adds a touch of complexity and acidity
- Citrus Juices: Brings brightness and tenderizes the meat
- Coconut Milk: Creates a creamy, exotic braising environment
Aromatics are also key to making your braised chicken shine. Here are some ingredients to consider:
- Fresh herbs like thyme, rosemary, and sage
- Garlic cloves for depth
- Onions and shallots for sweetness
- Ginger and lemongrass for international flair
When making braised chicken, finding the right balance is important. Mix different liquids and aromatics to create unique flavors. Try different combinations to find what works best for your chicken and taste.
Pro tip: Let your braising liquid reduce naturally during cooking. This will concentrate the flavors and make a fantastic sauce. Your braised chicken will be unforgettable.
Troubleshooting Common Braising Problems
Braising chicken thighs with olives can be tricky. Even skilled cooks face issues that affect their dish. Knowing how to solve these problems ensures a perfect meal every time.
Braising needs precision and careful attention. When cooking chicken thighs with olives, several common problems can occur.
Fixing Soggy Skin Issues
Crispy skin is key to a great braised chicken dish. To avoid soggy skin:
- Pat chicken thighs dry before seasoning
- Use a paper towel to remove excess moisture
- Start cooking at a high temperature to crisp the skin
- Remove lid during the last 15-20 minutes of cooking
Adjusting Cooking Times
Cooking times for chicken thighs with olives vary. Factors include:
- Chicken size and weight
- Oven temperature variations
- Desired level of doneness
- Specific recipe requirements
Pro tip: Use a meat thermometer to ensure chicken reaches 165°F internally.
Managing Liquid Levels
Managing liquid is key for tender meat and crispy skin. Too much liquid can make chicken soggy, while too little can cause burning. Aim to cover only about one-third of the chicken during braising.
By mastering these troubleshooting techniques, you’ll be able to create restaurant-quality crispy braised chicken thighs with olives right in your own kitchen.
Serving and Storage Tips for Braised Chicken
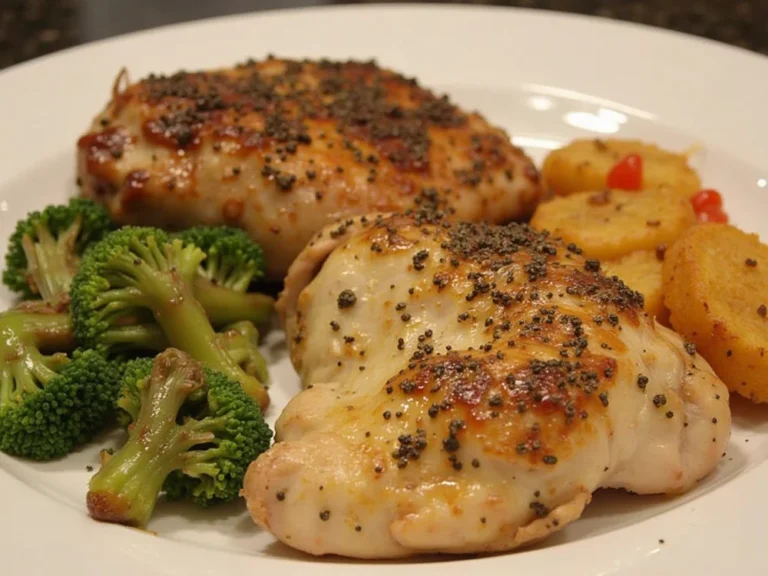
Your oven braised chicken thighs with lemons and capers are a feast for the eyes and taste buds. To showcase their crispy skin and rich flavor, follow some expert serving tips.
Here’s how to plate your braised chicken like a pro:
- Place the chicken on a warm platter to keep it hot
- Spoon extra pan juices with capers and lemon zest over the chicken
- Garnish with fresh herbs like parsley or thyme
- Serve with roasted veggies or creamy polenta
Storing leftover oven braised chicken thighs is key to keeping them tasty. Refrigerate your chicken within two hours of cooking in a sealed container. It stays good for 3-4 days in the fridge.
Reheating tips to keep the skin crispy:
- Preheat oven to 350°F
- Put chicken in an oven-safe dish
- Add a bit of chicken broth to keep it moist
- Cover with foil and warm for 10-15 minutes
- Uncover for the last 3-5 minutes to crisp the skin
For those who love meal prep, these chicken thighs are ideal. They freeze well, making it easy to enjoy a fancy meal anytime.
Conclusion
You now know how to make perfect braised chicken. This dish is tender and crispy, perfect for any occasion. It’s sure to impress your family and friends.
The secret to great braised chicken is knowing how to balance temperature, moisture, and seasoning. With the techniques you’ve learned, you can make rich flavors and crispy skin every time. Try different herbs, spices, and liquids to make it your own.
Practice makes perfect. Each time you cook braised chicken, you’ll get better. Don’t be afraid to try new things. Braised chicken is all about creativity and flexibility.
Now, it’s time to get cooking. Choose your favorite chicken cut and start your braised chicken journey. Let your culinary skills shine!
FAQ
What makes braised chicken thighs different from other chicken dishes?
Braised chicken thighs are special because they combine tender, juicy meat with a crispy skin. The slow cooking process makes the meat incredibly succulent. The high-heat finishing technique ensures a crispy exterior.Unlike other cooking methods, braising lets you develop deep, rich flavors. You cook the chicken in flavorful liquids like wine, broth, or citrus juices.
Can I achieve crispy skin when braising chicken?
Absolutely! The key is to start by thoroughly patting the chicken dry. Use a two-step cooking process. Begin by searing the chicken skin-side down to create an initial crisp.Then, finish the dish at a higher temperature to render the fat and crisp up the skin. Use techniques like uncovering the dish during the last portion of cooking. You can also use the broiler for a final crisp.
What are the best cuts of chicken for braising?
Chicken thighs are the absolute best cut for braising. They have a higher fat content that keeps the meat moist and tender. Their robust flavor stands up beautifully to long cooking times.Bone-in, skin-on thighs work well, as the bone helps retain moisture. It adds depth to the overall flavor of the dish.
How long should I braise chicken thighs?
Typically, chicken thighs take about 35-45 minutes to braise. This depends on their size and your specific recipe. The ideal internal temperature should reach 165°F (74°C).For crispy skin, spend the last 10-15 minutes of cooking uncovered at a higher temperature. This helps the skin crisp up and render the fat.
What are some great flavor combinations for braised chicken?
Classic flavor combinations include lemons and capers, which add bright, tangy notes to the rich chicken. Other popular options include olives and herbs, white wine with garlic and thyme.Or a Mediterranean-inspired mix with tomatoes, rosemary, and roasted vegetables. The beauty of braising is how well it accepts different flavor profiles.
Can I make braised chicken ahead of time?
Yes! Braised chicken actually improves in flavor when made ahead. You can prepare the dish 1-2 days in advance and reheat gently in the oven.To maintain crispy skin, remove the skin before storing. Crisp it up again briefly before serving by placing it under the broiler for a few minutes.
What equipment do I need for braising chicken?
The most essential tool is a heavy-bottomed pot like a Dutch oven that can go from stovetop to oven. You’ll also want a good pair of tongs, a meat thermometer, and a pan that can withstand high temperatures.A cast-iron skillet or enameled cast-iron pot works wonderfully for achieving that perfect crispy skin and even cooking.
How do I prevent my braised chicken from becoming soggy?
The key to avoiding soggy skin is moisture control. Always pat your chicken completely dry before cooking. Use high heat for the initial sear.Uncover the dish during the last portion of cooking to allow moisture to evaporate. If the skin isn’t crisping, you can finish it under the broiler for a few minutes. Watch carefully to prevent burning.


